
You’ve probably seen a document or two with a header or footer that has left and right-aligned text. It might also have centered text. These alignment configurations are easy to accomplish in the header because those sections have special attributes, and you can learn more about those particular attributes by reading How to align header or footer content to the left and right margins in Microsoft Word.
SEE: Google Workspace vs. Microsoft 365: A side-by-side analysis w/checklist (TechRepublic Premium)
Unfortunately, if you’ve tried to apply separate right and left alignments to the same line of text in the body of a document, you’ll quickly learn the task is impossible.
Somewhere along the line, you might have learned how to force the issue by inserting a table, but that’s not the only way to align text in the same line to both the left and right margins. In this tutorial, I’ll show you how to do so by using alignment tabs.
For this tutorial, I’ll be using Microsoft 365 on a Windows 10 64-bit system, but you can also use earlier versions of Word. It’s important to note this technique isn’t appropriate for the browser edition: It won’t let you set a tab, and it won’t display pre-existing tabs correctly within the context of this technique.
For an additional visual to follow along with, you can download our demonstration file here.
Jump to:
- About Word alignment options
- About aligned tabs
- How to set a right-aligned tab
- How to use a right-aligned tab
- Additional Word formatting tools
About Word alignment options
Learning how to use more than one kind of alignment in the body of a document isn’t all too difficult, but first, you’ll need to understand Word’s different alignment options:
- Left.
- Center.
- Right.
- Justified.
You’ll find them in the Paragraph group on the Home tab. Figure A shows an example of all four.
Figure A
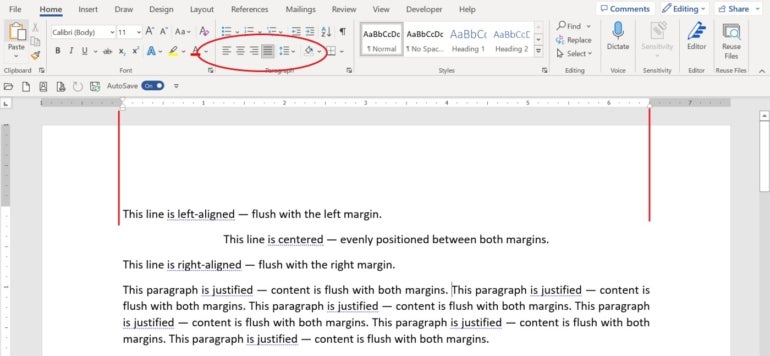
The red lines on either side indicate the left and right margins.
About aligned tabs
An aligned tab is exactly what it sounds like — it lets you determine the alignment of content with a tab. With tabs, you have five alignment options:
- Left: Aligns text with the tab.
- Center: Aligns text within the tab’s left and right positions.
- Right: Aligns text to the right side, or the tab position’s border.
- Decimal: Aligns decimal with the tab position.
- Bar: Draws a vertical line.
Now that you know what types of alignment tabs Word supports, let’s create one. Specifically, we’ll create a right-align tab at the right margin. That way, we can enter content at the left margin and then use the tab to align content to the right margin.
How to set a right-aligned tab
Before setting the tab, check the document’s margins. If you’re using the out-of-the-box Normal template, right and left margins are both one inch, as shown earlier in Figure A. However, if you look at the right margin on the ruler, you’ll find that it’s set at 6.5 rather than 7.5. This is because your printer determines the right position. You’ll need to set the right-aligned tab to the same position as the document’s right margin, whatever that might be.
Now, let’s create the right-aligned tab as follows:
- Click the Home tab.
- Click the Paragraph group’s dialog launcher to open the dialog.
- Click Tabs in the bottom-left corner.
- Enter 6.5 in the Tab stop position.
- Click Right in the Alignment section (Figure B).
Figure B

- Click Set.
- Click OK.
How to use a right-aligned tab
It’s impossible to apply more than one alignment property to the same line of content in Word. For instance, if you enter text and apply center alignment, and then you enter more text and apply right alignment, Excel will right-align the entire line. In this case, you would lose the center alignment.
SEE: Premium Microsoft Office Training Certification Bundle (TechRepublic Academy)
Usually when you need that kind of arrangement, you would insert a table with two or more cells and apply alignments to the cells. It works and it’s easy, but you have to insert a table every time you encounter one of these lines. There’s another way that doesn’t require a table at all: Alignment tabs.
How to split a sentence with the right-alignment tab
In the last section, you added a right-aligned tab. In this section, we’ll enter a sentence and then split it using the right-alignment tab as follows:
- Enter some text, such as: “This line is both left and right aligned.” By default, Word aligns this text with the left margin.
- Click to the left of “and” in your sentence and press Tab.
As you can see in Figure C, everything after the word “and” is now aligned to the right margin. When you pressed Tab, Word used the right-aligned tab you created in the last section. As a result, the text to the right of the cursor was pushed to the right margin.
Figure C
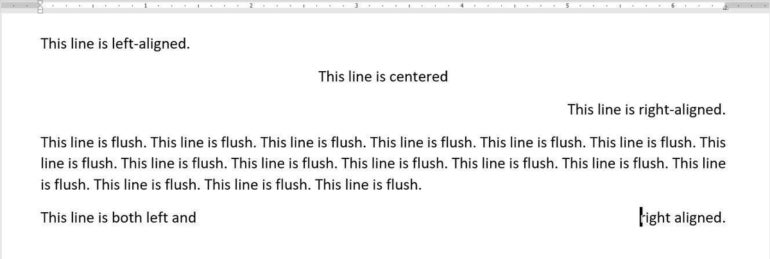
If you don’t get similar results, check your right margin again and make sure you entered the current measurement when creating the right-aligned tab.
All in all, an alignment tab is a better choice than a table if you have several instances of text throughout the document that need two different alignments.
Additional Word formatting tools
Changing text alignment in Word documents is a common way Microsoft Office users format their documents, but Word comes with a variety of other formatting tools and options that are readily available in the Home ribbon menu. Keep in mind that many formatting options are also accessible when you select text in the body of a document or right-click anywhere in the document.
If you’re looking to change formatting in your document, here are some other stylistic changes you can make beyond text alignment:
- Font: Font formatting options are available to adjust font size, font style, text highlight, text effects and typography, case changes, subscript and superscript, and strikethrough.
- Paragraph: Paragraph formatting options include bullets, numbering, multilevel lists, indent increases and decreases, sort, and line and paragraph spacing.
- Style: If you’re interested in updating the overall design of your document, Word has several preset headers and list formats you can choose from. You can also set up your own style in this section of the Home ribbon.
- Other formatting options: The format painter and the option to clear all formatting are great ways to make mass formatting changes to a Word document.
Whether you’re new to Word or you’ve been using it for years, these formatting tools are great to have ready in your back pocket. More advanced users have the option to granularly customize the settings for many of these formatting tools.
Read next: The 8 best alternatives to Microsoft Project (Free & Paid) (TechRepublic)