
Image: justplay1412/Shutterstock
A lot of documents with sections and headings format section headings above the section text. Regardless of what style you apply, those headings can get a bit lost. Fortunately, positioning those headings to the left side of the content—in the margin is a great way to make headings stand out in your Microsoft Word document. These are called sideheads or side headings. It sounds difficult, but it’s very simple to position headings to the left of the content, in the left margin, and in this article, I’ll show you how to do so.
I’m using Microsoft 365 on a Windows 10 64-bit system, but you can use earlier versions. Word Online won’t maintain the modified style online, and you can’t modify the style online. For your convenience, you can download the demonstration .docx and .doc files.
Picking the heading style in Word
When formatting a document, you can use one of the built-in heading styles or a modified style. I’m using the built-in Heading 2 style. Choosing a header style is an important decision because you can use it only for the sidehead text. If you apply it to other content that you don’t want in the side margin, you will end up with a mess. So, choose a style that you won’t be applying in any other way. Before we modify the style, we need to apply it.
How to modify the style in Word
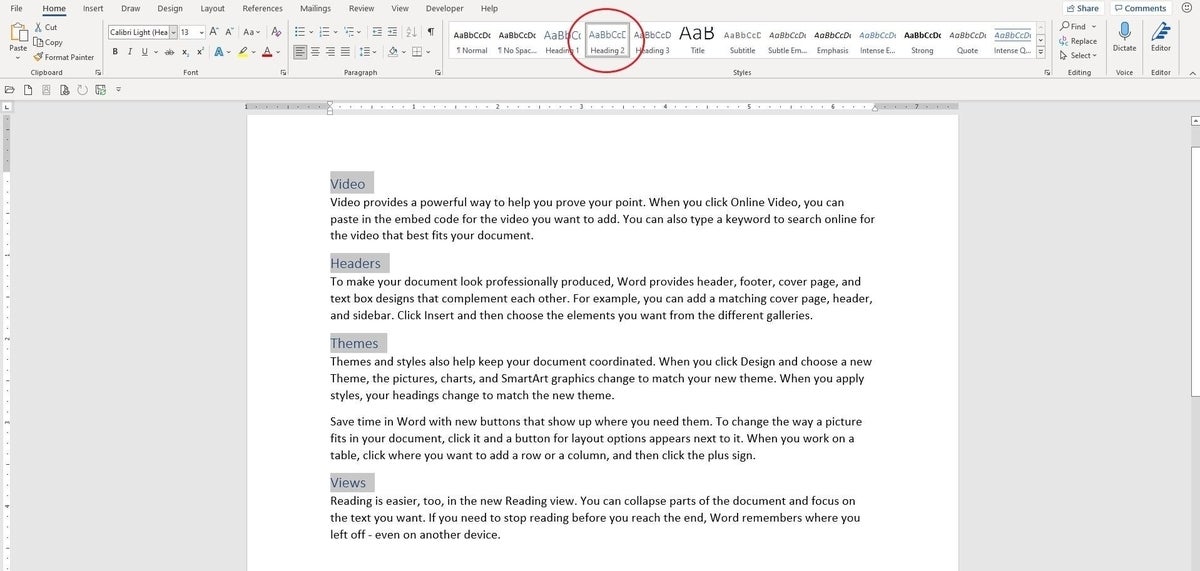
The simple document shown in Figure A has a few paragraphs and headings. The content is Normal style, and the headings (blue text) are Heading 2 style. If you’re working with your own content and you don’t know how to apply a style, select the heading text and click Heading 2 in the Styles gallery on the Home tab.
Figure A
Once you have applied the Heading 2 style to all the headings that you want to position in the left margin, you’re ready to modify Heading 2 as follows:
- Right-click Heading 2 in the Styles gallery in the Styles group on the Home tab (circled in Figure A). It isn’t necessary to select the headings first.
- Choose Modify from the resulting dropdown.
- In the resulting dialog, click Format (in the bottom-left corner) and choose Frame from the dropdown list. These options will allow you to reposition any content styled as Heading 2.
- In the Text Wrapping section, click Around if necessary.
- In the Size section, choose Exactly from the Width dropdown. Enter 0.75″ as the At setting.
- In the Horizontal section, choose Left from the Position dropdown and Page from the Relative To dropdown. In the Vertical section, change nothing (Figure B).
- Click OK twice.
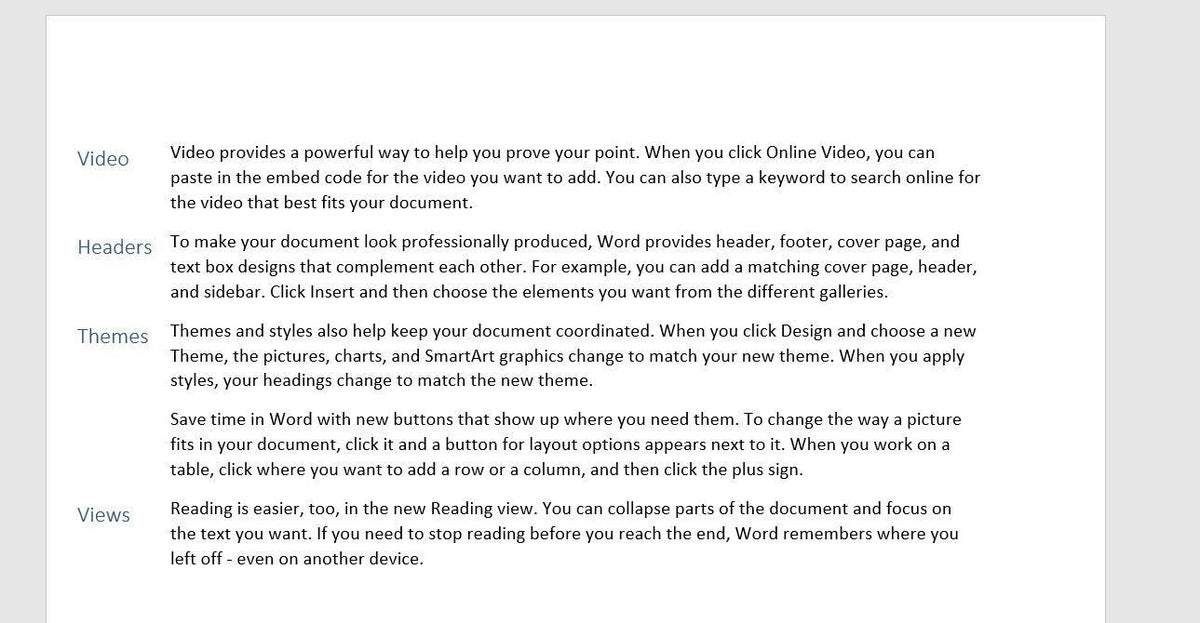
Figure C shows the results; the Heading 2 content is in the left margin, flush with the first line of that section.
Figure B
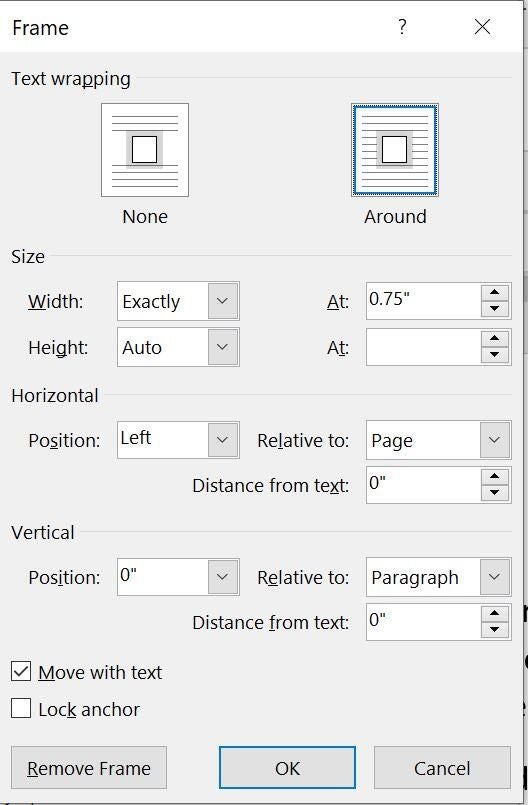
Figure C
It’s important to remember that the first try might not be exactly what you want; don’t be surprised if you have to go back in and tweak the settings a bit. Understanding what these settings do is the key to getting it right quickly. You can also use Undo, Ctrl + Z to reset the last changes.
In this case, the headings are positioned well but I don’t like the new left margin. It is too close to the left edge of the paper. That’s easy enough to fix by setting a new left margin as follows:
- Click the Layout tab.
- In the Page Setup group, click the Margins dropdown.
- Choose Custom Margins at the bottom of the list.
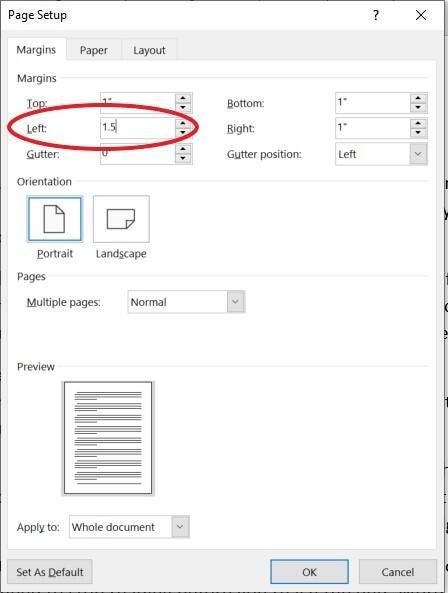
- In the resulting dialog, enter 1.5 for the Left setting as shown in Figure D.
- Click OK.
Figure D
As you can see in Figure E, the left margin is a bit farther away from the edge and all of the frame settings adapted to the change. It won’t matter whether you change the margin before or after setting the frame options. If changing the left margin doesn’t fix things, tweak the frame settings a bit. As you add more headings and text, the style will take care of repositioning the new headings into the left margin.
Figure E
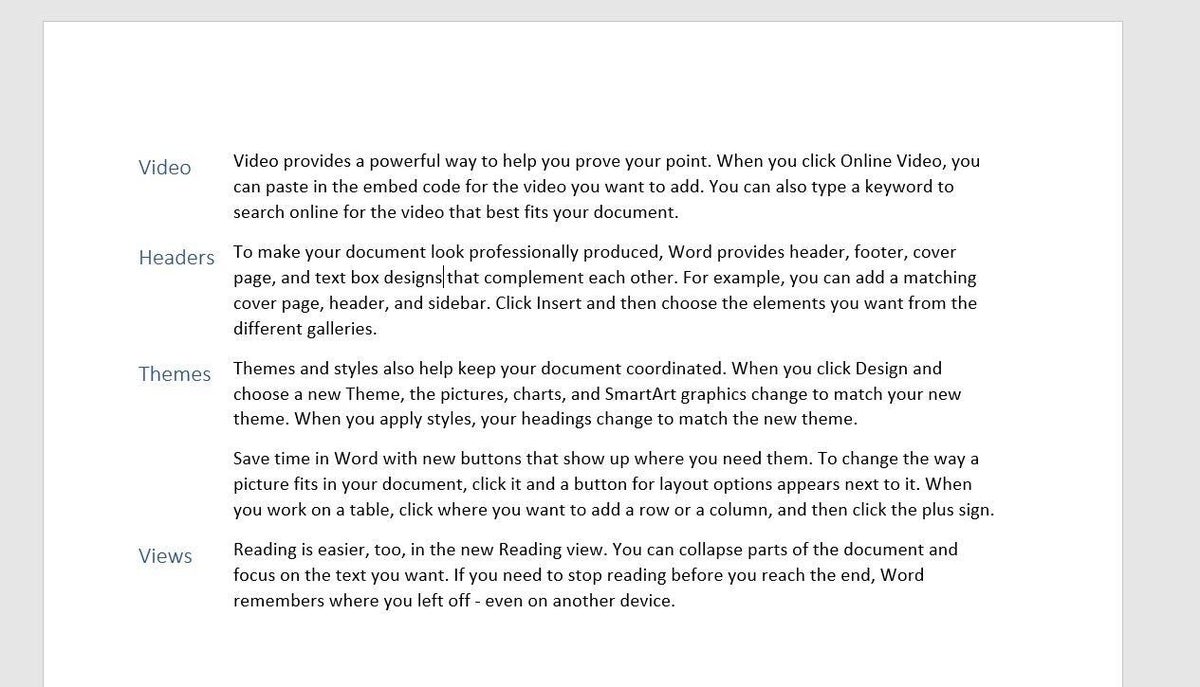
If you don’t understand how the frame settings managed this big adjustment, read on.
About the frame settings in Word
If you’re not familiar with the document frame and its settings, you’ll have a hard time getting the settings right. You might end up guessing—and an educated guess is OK—but changing the settings willy-nilly will be frustrating.
A frame is similar to a text box in that it’s a container for text. Frames are important for our technique because they can be defined in a style, as we did previously. Frames are still available via the Legacy Tools dropdown in the Controls group on the Developer tab. When inserted this way, the default frame has a border. At this point in Word’s evolution, I can think of no reason to use a frame instead of a text box other than defining the frame via a style. It’s definitely not intuitive, but it’s a flexible and powerful tool when added this way.
Now let’s review the settings:
- The Text Wrapping options aren’t important to this technique; both will give us the same effect.
- The Width setting determines how wide the frame is. We set ours to be exactly 1 inch from left to right. The Height settings will do the same, but Auto works for our purposes.
- The Horizontal position determines the position of the frame in relationship to the body of the document. By combining Left and Page, the frame positions itself in the left margin. You might think the Margin setting makes more sense, but that setting will move the frame inside the left margin.
- The Vertical options are similar to the Horizontal; they determine where the Heading 2 content goes in relation to the content—the default options position the heading next to the paragraph it goes with. By changing the Position setting from 0 to something else, you could offset where the headings appear in relation to its paragraph.
Warning
If you plan to distribute these files, I recommend that you not use the Automatically Update option (in the Modify Styles dialog). This option is available when you modify a style, but it isn’t selected by default. However, anytime you’re modifying a style, you should check this option. There are few uses it for it, and it shouldn’t be checked in a distributed file unless there’s a specific reason for doing so. If this item is selected for Heading 2, the Heading 2 styled content will be dependent on the Heading 2 style on the recipients’ systems. Unless their Heading 2 style matches your modified Heading 2 style, the document will lose the sideheads.

