Android is one of the most versatile mobile ecosystems that you’ll ever use. From the look and feel, you can change the landscape of the platform with ease and power. The fonts on your system are no exception.
There are plenty of reasons you might want to change up your fonts — legibility, company branding, a unique look and more. Although not available for every variation of the Android theme, you can switch up your fonts without too much hassle. I want to illustrate how you can manage more and better fonts on both rooted and unrooted Android devices.
Unrooted vs. rooted Android devices: What’s the difference?
Any normal smartphone you might buy from a reputable retailer is most likely to be unrooted. Rooting is a process that gives users more control over their Android devices. This process is not something done by the original phone manufacturer.
Rooted Android devices give users root access, allowing them to install apps that require this type of access. Users who have rooted devices can also change system settings and modify the software on the device.
SEE: Learn how to unroot your Android device.
While rooting devices comes with benefits, it also has some downsides, including possible problems with official updates, app compatibility, security risks and the risk of voiding the guarantee.
When it comes to fonts, a rooted Android device gives you quite a bit more control over what you can do. But, even unrooted smartphones have some flexibility when it comes to fonts. Let’s first look at how to manage your fonts on an unrooted device, and then, I’ll highlight the power of the rooted smartphone.
Android font apps for unrooted devices
Your best bet for managing fonts on an unrooted Android device is by way of a third-party Android font app. GO Launcher EX is one of the most popular fonts for this purpose. With this home screen launcher, you can download any third-party font files into the GOLauncherEX/fonts folder and have GO Launcher EX scan the folder to add the new fonts.
There’s one catch. When you plug your device into your computer to copy the .ttf file(s) over to the phone storage, you probably won’t find the GOLauncherEX folder. To get around that, create a folder called FONTS in the Downloads folder — and then, using a file manager like ASTRO File Manager, copy and paste the .ttf file to GOLauncherEX/fonts, which will appear in the ASTRO File Manager.
To scan new fonts with GO Launcher EX follow these steps:
1. Open GO Launcher EX by tapping on the app.
2. Long-press on your home screen.
3. Tap on GO Settings.
4. Select Font from the menu (Figure A).
Figure A
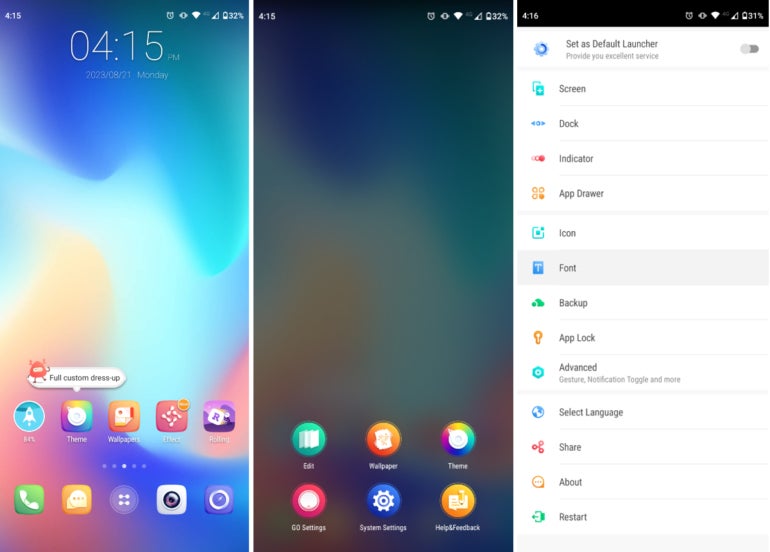
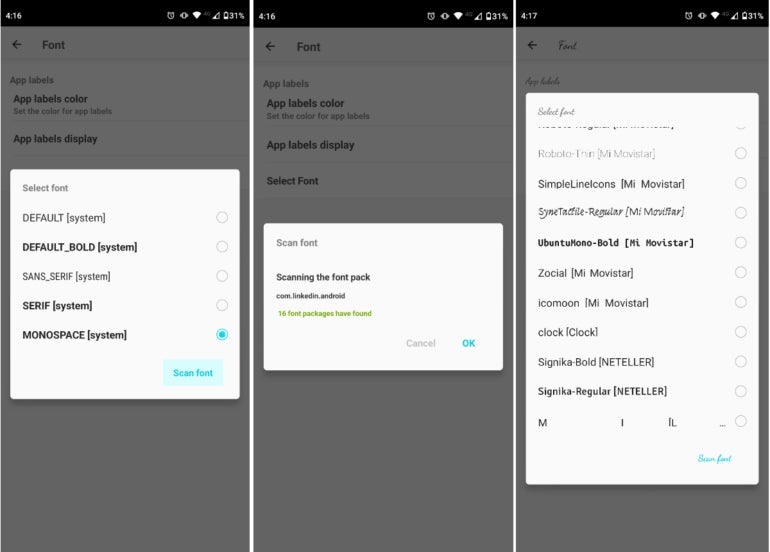
5. Now, tap on Select Font. The app will show you a list of all the available fonts.
6. Tap Scan Font at the bottom of the app to search for the new fonts you download into your phone folder. The app will automatically run a scan and show you a list of all the available fonts, including the ones you downloaded.
7. Find the font you want, and select it (Figure B).
Figure B
Other font apps for Android
What if you don’t want to use a third-party home screen launcher? If you happen to have a Samsung device, you’re in luck (rooted or not). iFont is another popular app that allows you to browse a large selection of fonts, download them and install them. It’s important to note that iFont only works on Samsung phones.
SEE: Android 12 allows you to use themed icons.
To download, select and install fonts with iFont:
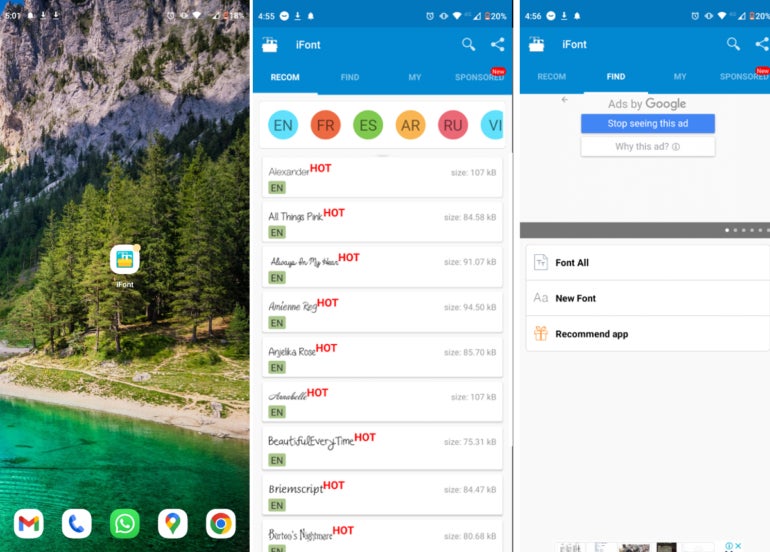
1. Download and install iFont.
2. Open the app.
3. On the top menu, choose FIND, and then, tap Font all. A full list of available fonts will appear (Figure C).
Figure C
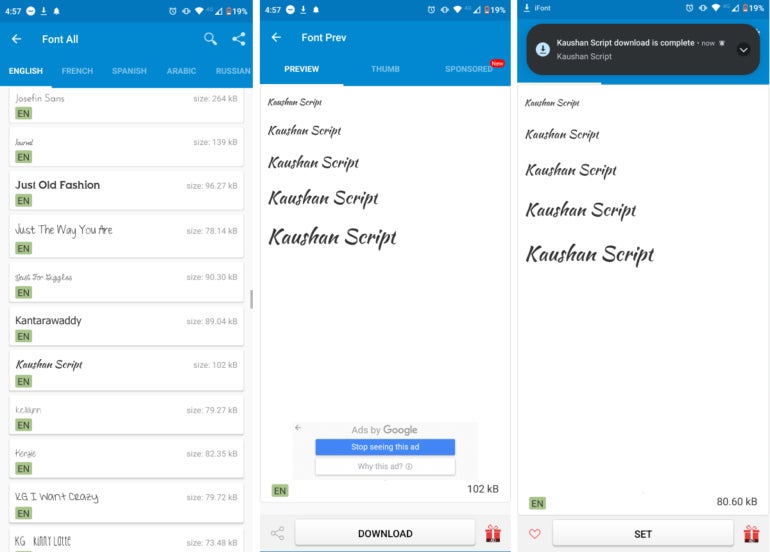
4. Once you find the font you want, tap on it, select Download and then tap Select (Figure D).
5. Once you have installed the font, go to your Samsung Display and Gesture menu on your phone under Settings, and select the new font as your default font.
Figure D
Besides iFont, there are several Android font apps you can download from the Play Store. These include HiFont and FontFix, both of which are for rooted devices.
Changing fonts on rooted Android devices
Users who have a rooted Android device can make the font changes they want using different apps. Let’s look into two of the most widely used, iFont and Font Installer.
How to change fonts with iFont
A rooted device will give you even more power with fonts. If your phone is rooted, you can use iFont to install custom .ttfs to be used as your system defaults. The process is similar to setting a standard font with iFont.
To do this:
1. Open the iFonts.
2. Go to My and then My Font, and then, tap click this written in red (Figure E).
Figure E
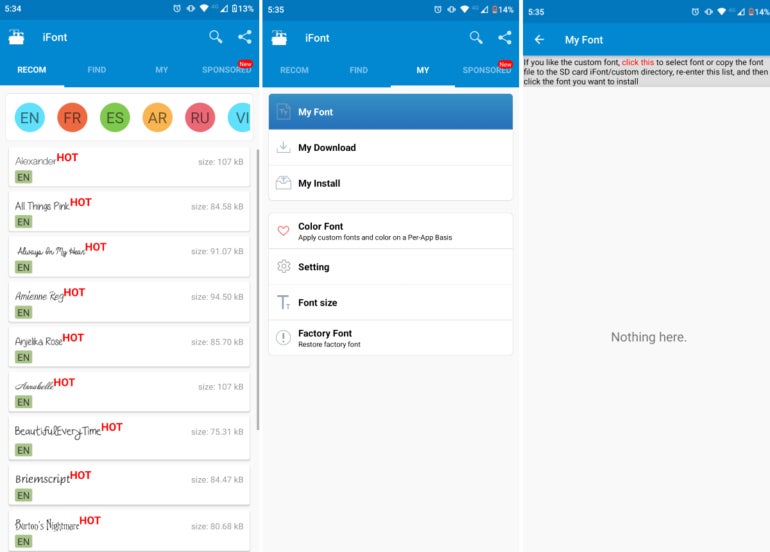
3. The app will open a file explorer for you to search the folder where you downloaded the .ttfs file and then select it.
How to change fonts with Font Installer
Font Installer is an app you can use to add .ttf files from your computer to your rooted smartphone and use them as the default system font. Once installed, you can then copy your .ttf files from your computer into a directory on your device and use that font as the default.
SEE: Here’s how to reset your Android home screen back to the default.
Here’s how to set a font with Font Installer as your system default:
1. Install Font Installer on your rooted Android device.
2. Copy your .ttf files into a folder on your device.
3. Open Font Installer, and swipe to the Local tab.
4. Navigate to the folder containing the .ttf files, and select the file to be used.
5. Tap Install or Preview if you want to get a look at the font first. If prompted, grant root permission for the app.
6. Reboot the device by tapping YES.
A word of warning with Font Installer: This app is not currently available through the Play Store. Additionally, it doesn’t work on all rooted devices.
If you’re looking for a clean and simple way to change the font, look no further than one of these methods. Whether rooted or not, you can find plenty of fonts to help personalize or brand your Android device.


